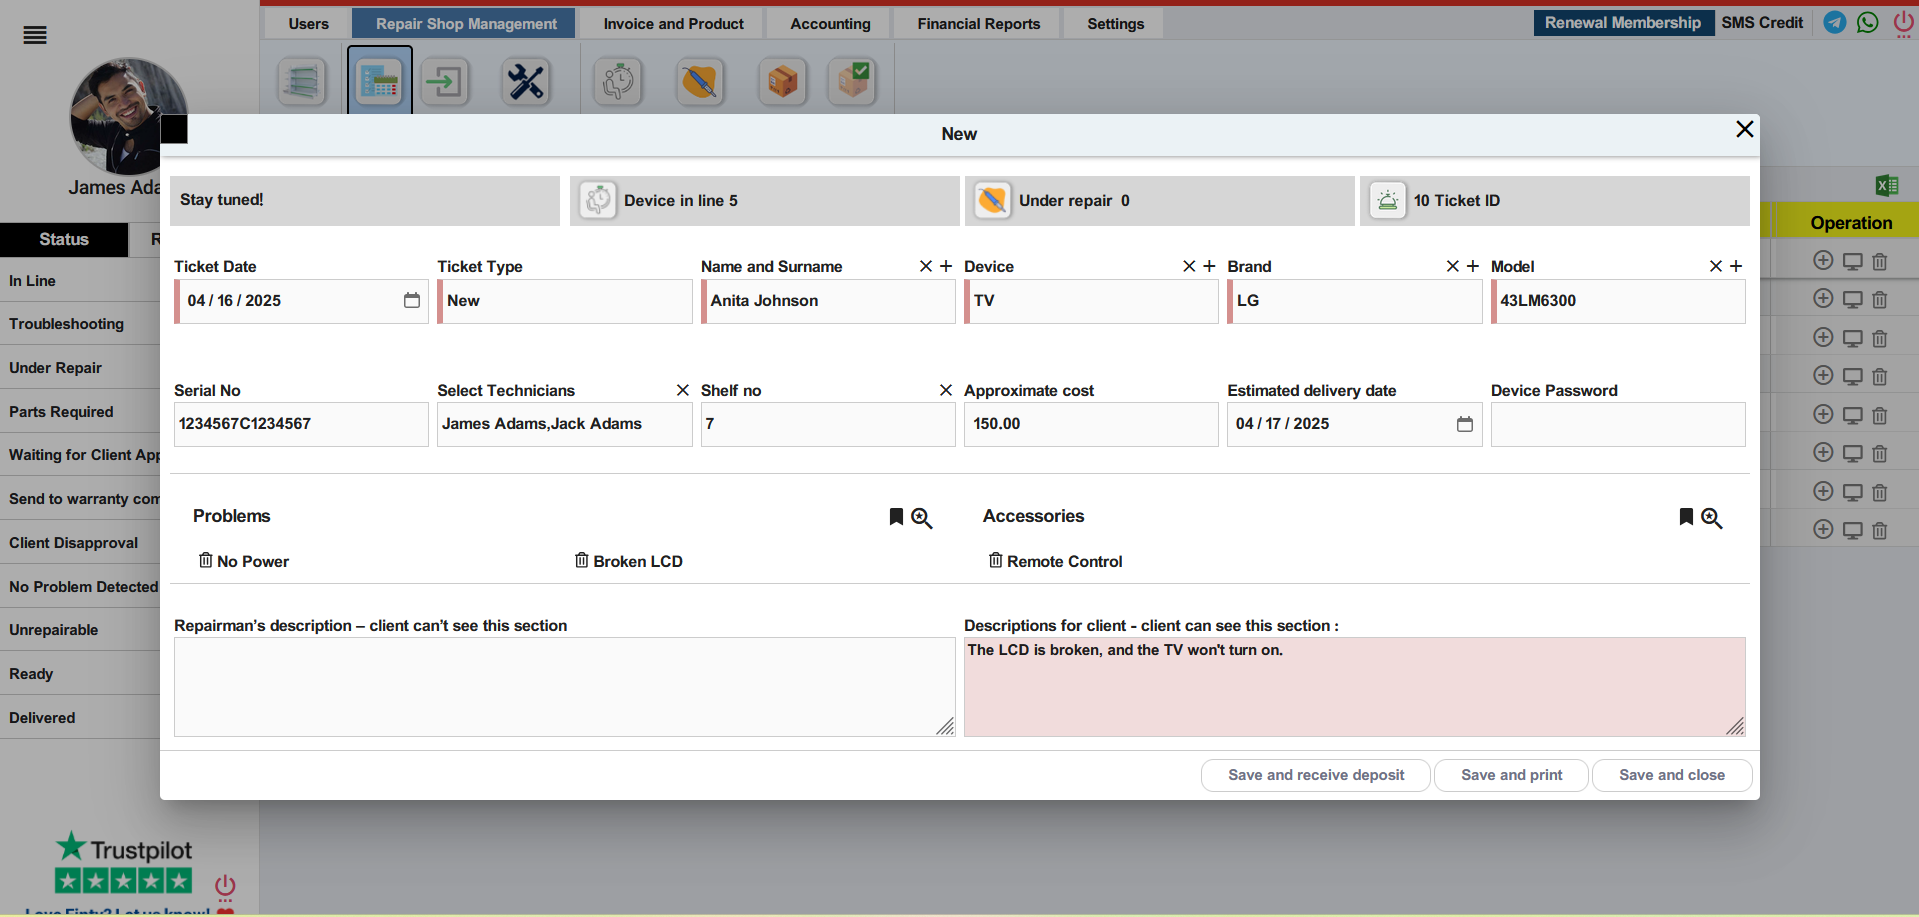
Repair Ticket Management in Finty

Ticket Service
New Option
Filter Option
Tutorial Video

Ticket Service
New Option
Filter Option
Tutorial Video
Start a New Repair Ticket
Starting a new repair ticket in Finty is easy. Simply navigate to the “Tickets” section from your dashboard and click on “New” to begin. This opens up a simple form where you can fill in all the necessary details, from customer information to device specifics. This streamlined process ensures quick ticket creation and prevents errors, saving valuable time for your team.
- Navigate to the “Tickets” section.
- Click on “New” to begin.


Enter Device Information
When entering device information, select the brand and model from the options. If needed, you can quickly add any missing models using the “+” option. Add the serial number either manually or by using a barcode scanner for faster input. Include a detailed description of the damage, and don’t forget to list any accessories that came with the device. If an accessory isn’t in Finty’s pre-existing list, you can quickly add it with the “+” option.
- Device Info: Select the brand, model, and serial number of the device.
- Description of Damage: Enter the reported issues from the customer.
- Add Accessories: Include any accessories that come with the device.

Document Device Condition with an Image
Capturing a photo of the device when it is checked in is a critical step in documenting its condition. This image can serve as an important reference in case any disputes arise regarding damage or issues that were present before the repair began. By uploading the photo to Finty, you ensure that there is clear, visual proof of the device's original condition. This not only helps to protect your business but also instills confidence in your customers, as they can see that you are thorough and transparent with the repair process.

Generate QR Code for Tracking
Each repair ticket is automatically assigned a unique QR code, which customers can scan to view the live repair status of their device. This feature enhances transparency and provides customers with an easy way to track the repair process without needing to contact the shop.
Next, double-check all entered information for accuracy, and remember that fields with red lines are mandatory and must be completed before proceeding.

Finalize and Confirm Repair Ticket
After carefully reviewing all the entered information—such as customer details, device specifications, damage descriptions, and accessories—click the “Save” button to officially create the repair ticket. This will record all data in your system and generate a unique, professional ticket. Once saved, you can either print a physical copy of the ticket or send it digitally to your customer, ensuring that all repair details are properly documented and easily accessible. This streamlined repair ticket management process ensures transparency and smooth communication from start to finish.

Print and Share the Repair Ticket
Once the repair ticket is finalized, print it to provide your customer with a physical copy. This printed ticket will include a unique QR code that links directly to the online repair status of the device. When your client scans the code, they can view real-time updates on the repair progress, offering immediate visibility and reducing the need for follow-up inquiries. By incorporating repair ticket management with real-time tracking, you enhance the customer experience, increase transparency, and build trust, leading to greater customer satisfaction and repeat business.
Start a New Repair Ticket
Starting a new repair ticket in Finty is easy. Simply navigate to the “Tickets” section from your dashboard and click on “New” to begin. This opens up a simple form where you can fill in all the necessary details, from customer information to device specifics. This streamlined process ensures quick ticket creation and prevents errors, saving valuable time for your team.
- Navigate to the “Tickets” section.
- Click on “New” to begin.
Enter Device Information
When entering device information, select the brand and model from the options. If needed, you can quickly add any missing models using the “+” option. Add the serial number either manually or by using a barcode scanner for faster input. Include a detailed description of the damage, and don’t forget to list any accessories that came with the device. If an accessory isn’t in Finty’s pre-existing list, you can quickly add it with the “+” option.
- Device Info: Select the brand, model, and serial number of the device.
- Description of Damage: Enter the reported issues from the customer.
- Add Accessories: Include any accessories that come with the device.
Document Device Condition with an Image
Capturing a photo of the device when it is checked in is a critical step in documenting its condition. This image can serve as an important reference in case any disputes arise regarding damage or issues that were present before the repair began. By uploading the photo to Finty, you ensure that there is clear, visual proof of the device's original condition. This not only helps to protect your business but also instills confidence in your customers, as they can see that you are thorough and transparent with the repair process.
Generate QR Code for Tracking
Each repair ticket is automatically assigned a unique QR code, which customers can scan to view the live repair status of their device. This feature enhances transparency and provides customers with an easy way to track the repair process without needing to contact the shop.
Next, double-check all entered information for accuracy, and remember that fields with red lines are mandatory and must be completed before proceeding.
Finalize and Confirm Repair Ticket
After carefully reviewing all the entered information—such as customer details, device specifications, damage descriptions, and accessories—click the “Save” button to officially create the repair ticket. This will record all data in your system and generate a unique, professional ticket. Once saved, you can either print a physical copy of the ticket or send it digitally to your customer, ensuring that all repair details are properly documented and easily accessible. This streamlined repair ticket management process ensures transparency and smooth communication from start to finish.
Print and Share the Repair Ticket
Once the repair ticket is finalized, print it to provide your customer with a physical copy. This printed ticket will include a unique QR code that links directly to the online repair status of the device. When your client scans the code, they can view real-time updates on the repair progress, offering immediate visibility and reducing the need for follow-up inquiries. By incorporating repair ticket management with real-time tracking, you enhance the customer experience, increase transparency, and build trust, leading to greater customer satisfaction and repeat business.